


Hey guys! Today, We’ve got a super easy and practical DIY project for you - we’re making a simple, stylish storage rack. Perfect for your garage, workshop, or even a messy corner at home. And the best part? It’s totally beginner-friendly and uses just a few boards and some cordless tools. Let’s jump right in!
Materials You’ll Need
Lumber: 2 x 20 x 40' cedar boards
We recommend cedar for projects like this - it looks awesome, smells great, and naturally resists rot and bugs. Perfect for a garage or workshop setup.
Tools You’ll Need
We swear by cordless tools for projects like this. No cords, no tripping hazards, just freedom to move around. Here’s what you’ll need:
Cordless Circular Saw (7-1/4’’)
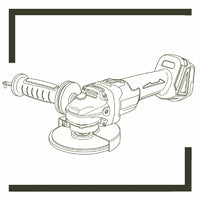
Random Orbital Sander (5’’)
Compact Router
Handheld Planer
Brad Nailer
Leaf Blower
Vacuum Cleaner
Let’s Get Started - Step by Step Guide
Step 1: Measure & Cut
First up - measuring and cutting. Super important! Measure twice, cut once.
You’ll need:
Back Panel: 9’’ × 36’’
Shelf 1: 23’’ × 9’’
Shelf 2: 23’’ × 9’’
Shelf 3: 16’’ × 9’’
Mark your lines, clamp the boards down, and cut with your cordless circular saw. Quick tip: clamp both sides of the line to prevent the wood from moving - it helps you get a straight, clean cut.
Safety tip: Always wear glasses, gloves, and a dust mask. Safety first, guys!

Step 2: Sand & Smooth
Nobody likes splinters, right?
Start sanding all surfaces and edges with your orbital sander until it’s smooth. If a board is a little uneven, grab your planer and shave it down gently - we want a perfect fit.

Step 3: Cut the Grooves & Handle Hole
Now it gets fun. This is what makes your rack look clean and professional.
1. Mark where your shelves will go on the back panel.
2. Use your cordless compact router to cut grooves about one - third the thickness of the board. Go slow and steady for precise cuts.
3. Then, cut a circular handle hole at the top - makes it easy to carry or hang.
4. Sand the grooves and handle hole with the orbital sander until smooth.
Quick tip: Routing produces a ton of sawdust, so keep your cordless blower handy to clear debris and keep your lines visible.

Step 4: Assembly
Time to see it come together!
Start by dry fitting the shelves into the grooves. If they’re a bit tight, lightly sand the ends. Once everything fits perfectly, secure the shelves with a brad nailer - the storage rack is now fully assembled and ready to use.

Step 5: Clean Up & Show Off
You’re done! Give your new rack a quick clean with your cordless vacuum, wipe off the dust, and take a step back. Feels good, right?
You’ve just built a clean, sturdy, and totally custom storage rack - with your own hands.

Guys, projects like this are super satisfying. Not only do you get organized, but you also get the pride of making something with your own hands.
So watch DIY videos, grab your boards, grab your tools, and start building today. Trust me, you’ll love the results!
